A Typical Java CI Pipeline
A simple article to discuss the typical Java CI pipeline.
Java has always relied on a lot of 3rd parties, its ecosystem is huge and there is a library or a tool for almost everything.
It is awesome for a passionated learner like me as it is never ending but it is also often a point brought by its detractors who claim it is an hindrance to its use or learning. Of course I still believe it is a great point to have such a rich ecosystem but I hear the point that some other languages like Golang are embedding more by default.
We will here look at some of these excellent tools the Java landscape has in order to build a standard Java CI pipeline. We will use:
- a Java project (of course)
- JaCoCo for test coverage
- Sonar for the static code analysis
- Nexus as an artifact manager
- Jenkins for the CI in the context of this post
We will build our project using maven and so will leverage maven plugins.
1. The Java project
You can anyway apply the exact same to any Java project built with maven.
I suggest we configure our project first to run our code coverage (JaCoCo), our static code (Sonar) analysis and the deployment of our artifacts on Nexus as all this can be run locally first before configuring Jenkins to automate it.
2. Code Coverage: JaCoCo
We will use JaCoCo maven plugin
pom.xml
----------------
<build>
  (...)
  <properties>
  	<argLine></argLine> <!-- for jacoco -->
  </properties>
  (...)

  <plugin>
  	<groupId>org.jacoco</groupId>
  	<artifactId>jacoco-maven-plugin</artifactId>
  	<version>0.8.7</version>
  	<executions>
  		<execution>
  			<!-- bound to phase initialize by default -->
  			<phase>validate</phase>
  			<id>jacoco-prepare</id>
  			<goals>
  				<goal>prepare-agent</goal>
  			</goals>
  		</execution>
  		<execution>
  			<!-- bound to phase verify by default -->
  			<!-- not used from CI but callable for local analysis -->
  			<id>jacoco-site</id>
  			<goals>
  				<goal>report</goal>
  			</goals>
  		</execution>
  	</executions>
  </plugin>
(...)
</build>
You can then run locally the following
mvn verify
and check the coverage has been generated as expected under target/site/jacoco.index.html; you should see a non 0 coverage as long as you have some unit tests executed.

Once the code coverage is working fine we can move to configure the Sonar analysis.
3. Static Code Analysis: Sonar
The sonar-maven-plugin will run sonar analysis and upload the results generated locally to the remote Sonar instance.
This plugin reads below properties to do so, they can be defined for instance in a profile either in the project or more generally in your maven settings as it is likely you reuse this across projects.
mvn-settings.xml
----------------
<profile>
    <id>sonar</id>
    <properties>
      <sonar.host.url>http://{host}:{port}/</sonar.host.url>
      <sonar.jdbc.driver>org.postgresql.Driver</sonar.jdbc.driver>
      <sonar.jdbc.username>sonarqube</sonar.jdbc.username>
      <sonar.jdbc.password>sonarqube</sonar.jdbc.password>
    </properties>
  </profile>
Then you can call to run the analysis and checks results are uploaded on your sonar
mvn -Psonar sonar:sonar
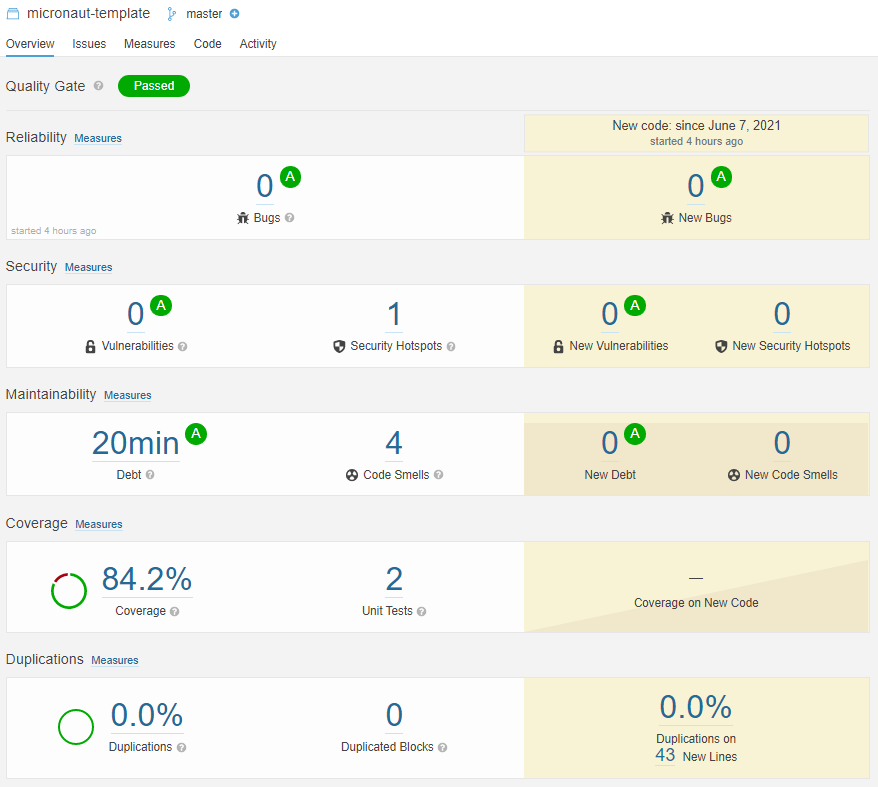
The sonar analysis has been executed, we retrieve our code coverage and many useful metrics.
4. Nexus
Once our project built, its artifacts will be deployed to Nexus. Its location is configures in the distributionManagement section in the project pom.xml as documented here The credentials to authenticate against Nexus are registred in maven-settings.xml
pom.xml
----------------
<distributionManagement>
    <repository>
        <id>maven-myorganisation-release</id>
        <!-- in general $maven-repo-name is suffixed by -release -->
        <url>http://{host}:{port}/repository/{maven-repo-name}/</url>
    </repository>
    <snapshotRepository>
        <id>maven-myorganisation-snapshot</id>
        <!-- in general $maven-repo-name is suffixed by -snapshot -->
        <url>http://{host}:{port}/repository/{maven-repo-name}/</url>
    </snapshotRepository>
</distributionManagement>
maven-settings.xml
----------------
<servers>
   <server>
      <id>nexus-snapshots</id>
      <username>deployment</username>
      <password>the_pass_for_the_deployment_user</password>
   </server>
</servers>
Then you can call to run the analysis and check the artifact is uploaded on your Nexus
mvn jar:jar deploy:deploy
Jenkins
Jenkins is the conductor of the pipeline, it will execute the steps we will instruct it to. These steps are:
- fetch the code from github
- execute the Jenkinsfile in the project which contains the core of our pipeline.
The Jenkinsfile has the following steps:
- Version control to fetch the code
- Build the project; this step will also generate our code coverage as if you remind we attached JaCoCo execution to validate phase.
- Run sonar Analysis
- Deploy our artifacts to Nexus
Pipeline File
pipeline {
    stages {
        stage('Version control') {
            steps {
                sh 'echo branch: ${BRANCH}'
                git credentialsId: 'kdefombelle', url: 'https://git.organisation.com/scm/~kdefombelle/micronaut-sample.git', branch: '${BRANCH}'
                sh 'ls -lrt'
            }
        }
        stage('Build') {
            steps {
                configFileProvider([configFile(fileId: 'mvn-settings', variable: 'MAVEN_SETTINGS_XML')]) {
                    sh 'echo maven settings: $MAVEN_SETTINGS_XML'
                    //-B,--batch-mode
                    sh 'mvn -B -s $MAVEN_SETTINGS_XML clean install'
                }
            }
        }
        stage('QA') {
            steps {
                configFileProvider([configFile(fileId: 'mvn-settings', variable: 'MAVEN_SETTINGS_XML')]) {
                    sh 'echo maven settings: $MAVEN_SETTINGS_XML'
                    sh 'mvn -B -s $MAVEN_SETTINGS_XML -Psonar sonar:sonar'
                }
            }
        }
        stage('Deploy') {
            steps {
                configFileProvider([configFile(fileId: 'mvn-settings', variable: 'MAVEN_SETTINGS_XML')]) {
                    sh 'echo maven settings: $MAVEN_SETTINGS_XML'
                    //https://stackoverflow.com/questions/6308162/maven-the-packaging-for-this-project-did-not-assign-a-file-to-the-build-artifac
                    //calling jar:jar before deploy:deploy sets some info in context to enable deploy:deploy to work (but does not recreate the jar)
                    //quicker than simply -Dmaven.test.skip=true
                    sh 'mvn -B -s $MAVEN_SETTINGS_XML jar:jar deploy:deploy'
                }
            }
        }
    }
}
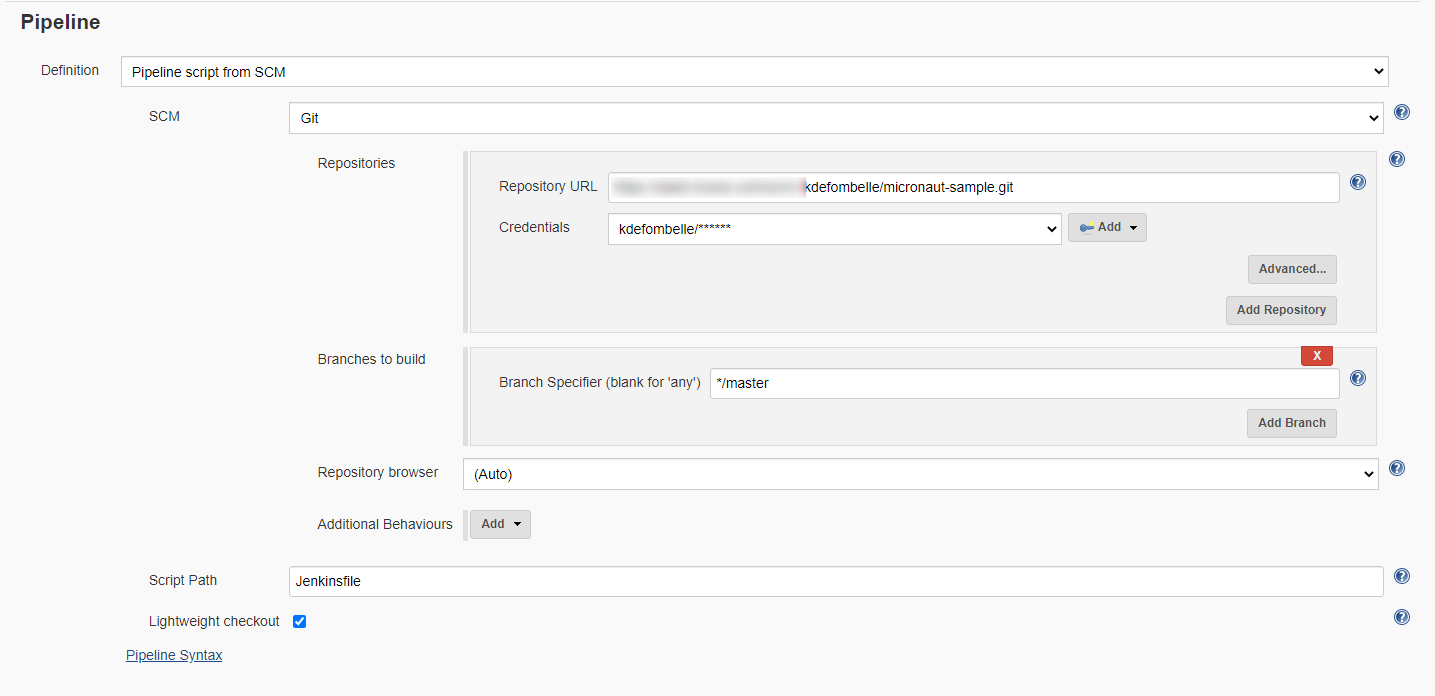
Jenkins Job Configuration
Jenkins configuration is very light as it will simply read the pipeline file Jenkinsfile from your repository and execute it.
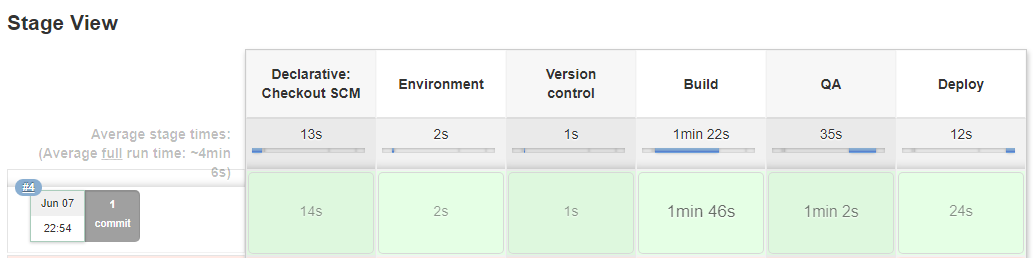
Once configured we can run our job and enjoy the full automation
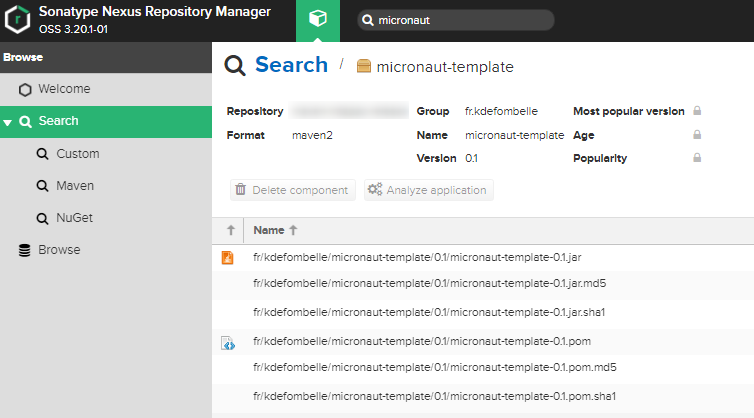
You can then check that your sonar analysis has been refreshed and your artifact(s) deployed on your repository manager, here Nexus. Last but not least our fresh artifact is now stored on Nexus.
Jenkins Server Configuration
Depending how your job are executed git and maven should be configured in Jenkins or on the server the jobs are executed. In my case the CI jobs are executed in the cloud within docker images and so some extra configuration is necessary. Also you may have noticed the pipeline refers to the identifiers of the git account and maven configuration.
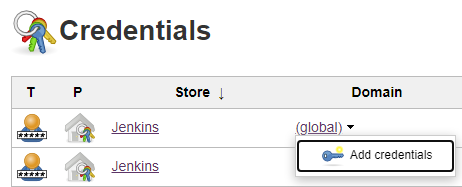
- Git account to fetch the code In the Jenkins left menu click on Configure Credentials, define a new credentials clicking like below and assign it an ID, this credentials ID will be used in the Pipeline to connect to git (in my case kdefombelle).
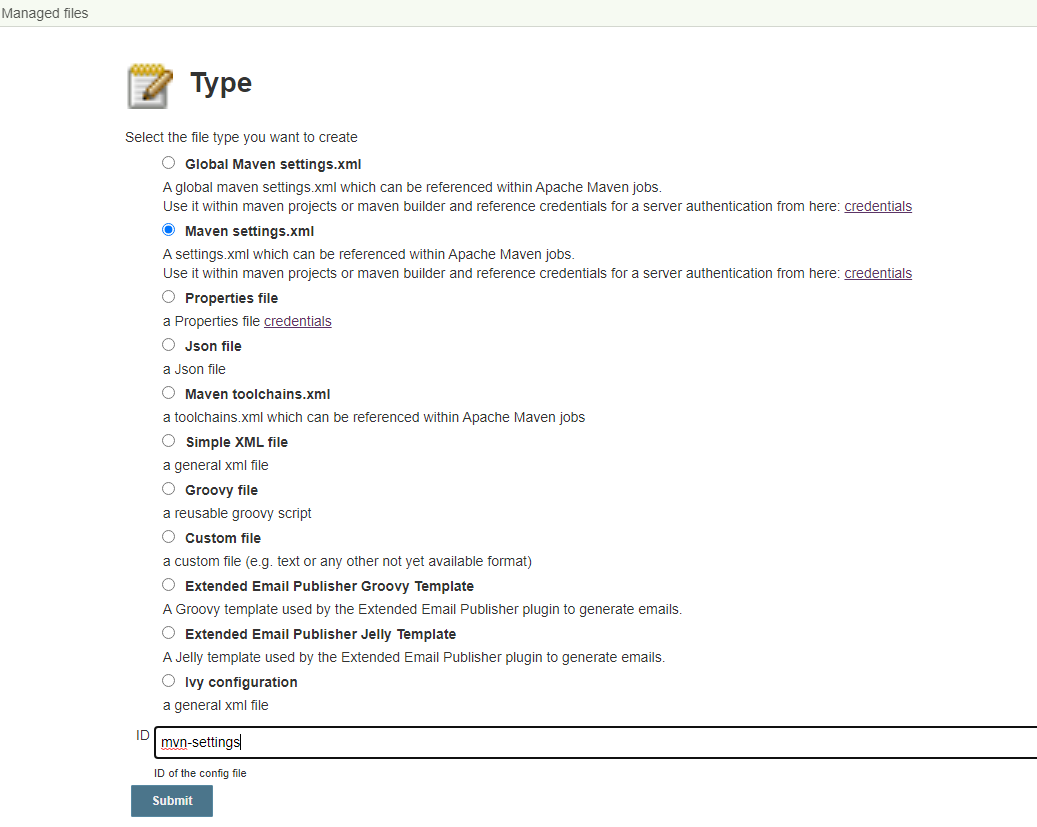
- Maven configuration f like me your CI jobs are executed in the cloud Manage Jenkins > Managed files > Add a new Config (in the left menu) and fill setting here again an ID, here mvn-settings
Enjoy Reading This Article?
Here are some more articles you might like to read next: